Author: chrisehmann

Assignment 3 Reflection

For our final project, we decided to create a lesson on Pythagorean theorem. We believed that this would be a great topic to demonstrate our understanding of core principles in this course, as math can be taught and expressed through so many multimedia forms. We believe that, as a group, we have created a comprehensive lesson that is perfectly suited to help any learner understand Pythagoras’ theorem.

Group Contributions

This project was something that required a full team effort. Because of the scope of our lesson, and the various forms of media that would be present in it (video, text, and graphics!), we thought that it would be best to assign each person one “key task”. Charlie was in charge of creating the video that demonstrates how to use the theorem, Ehtesham was tasked with creating an infographic that would be used to introduce learners to the fundamentals of the theorem, Alys was given the task of writing the contents of our reflection post, Chris wrote the lesson post, and Joel was given the task of writing our lesson plan and aiding with the posts. While these were the “main tasks” assigned to each individual, everyone helped out when necessary, such as during the various discussions we had (e.g., our initial discussions on what our lesson should be and look like).

Our Lesson Plan

Big Idea: What is the big idea that the learner will walk away with at the end of the lesson that is critical for learners at this stage of their learning path?

By the end of this lesson, the learner will know how to solve problems involving the Pythagorean theorem. They will understand how to identify problems that can be solved using the Pythagorean theorem, and will know how to apply the theorem properly when solving the problem. This key concept is pivotal at this stage of their learning path, serving as a foundational element in geometry with broad applications. Learners should not only be adept at using the theorem to find missing side lengths but also grasp its real-world relevance in fields like architecture and navigation.

Learning Outcome(s): What specific things will the learner know or be able to do by the end of the lesson?

By the end of this lesson, learners will have acquired a fundamental understanding of the Pythagorean theorem, comprehending that in a right-angled triangle, the square of the hypotenuse c is equal to the sum of the squares of the other two sides a and b, as shown in the formula c2 = a2 + b2. They must be able to apply this to real world problems and solve for missing sides of a right angle triangle using that formula.

Evidence of Learning: What does learning look like for this objective? (e.g., accurate performance of a task, correct use of terminology)

Evidence of learning for this objective includes accurate terminology usage for the theorem, such as determining which side of the triangle is the hypotenuse. Students must also be able to write the basic formula for Pythagoras theorem. They must be able to correctly calculate the lengths of a side (with unknown length) given the lengths of any two sides of a right triangle. Learning will also be demonstrated through students correctly identifying problems that can be solved through the theorem, and then applying the theorem.

Assessments: What will learners do to provide evidence of their learning? (e.g., a presentation, a test, a project)

There are multiple ways in which students will provide evidence of their learning. The lesson contains multiple activities, such as drawing triangles and measuring two of the sides, then using Pythagoras’ theorem to determine the missing side length. Also, at the end of the interactive video, a quick summary quiz will appear in which students can demonstrate their understanding of the theorem by selecting the correct answer.

Afterwards, the learner will be guided into completing a test that will comprehensively quiz them on the concepts that they have learned in this lesson.

Learning Activities: What learning activities will allow learners to acquire and practice the skills necessary to demonstrate their learning and complete the assessment successfully?

The lesson includes various learning material, such as an interactive video, an infographic, and text that aim to give the learner a comprehensive, robust understanding of Pythagoras’ theorem. During the video portion of the lesson, the learner will have the opportunity to solve problems through the interactive questions that will appear on screen. Afterwards, the learner will be given two learning activities that will allow them to practice and further develop their understanding of the theorem. These will include an activity where they will draw and measure right triangles, and use the theorem to figure out side lengths. The other activity will show the learner how to use emerging technology such as ChatGPT to generate unique exercises that they can then solve and verify through ChatGPT.

Using a Variety of Media in Our Lesson

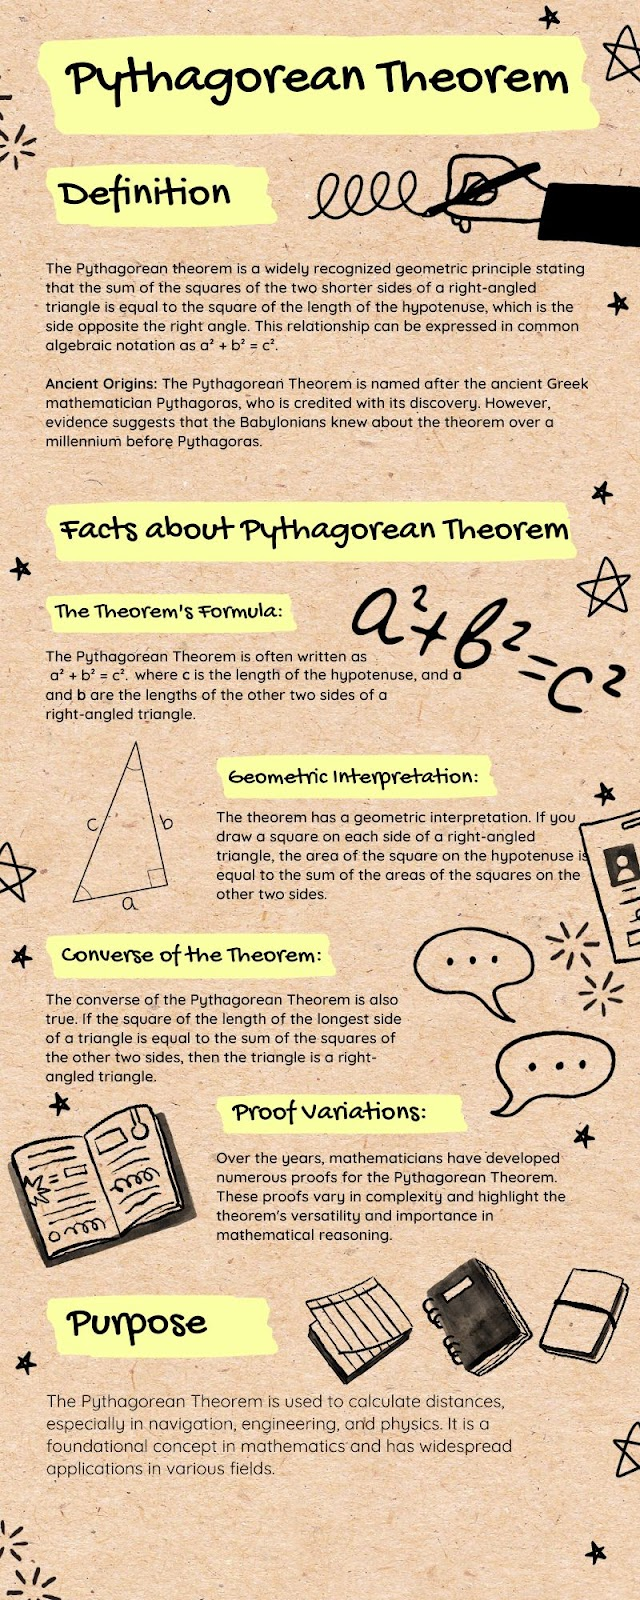
In our lesson, we chose to use a vast range of media to help the target audience. First, we used an infographic showing proof of Pythagoras’ theorem. This was made through Canva, and we made this because we thought that a visual medium (either through video or infographic) would be the best way to introduce learners to the theorem. While there is a lot of text present in the infographic, we believe that the imagery and sectioning that’s allowed in a infographic format allows for a much easier learning experience, rather than if we just had a wall of text.

To explain the theorem and demonstrate how to use it, we thought that video would be the best media solution. Video was recorded through ScreenPal and the lesson itself was conducted through Lucidspark, and then hosted on YouTube. We believe that it is best to host on YouTube due to their automatic captioning tool, and also because they are one of the most reliable video hosting platforms.

Text was used to segue between topics, and to explain the learning activities to students. This, and the entirety of our lesson, was written and hosted on WordPress. While we could have used video to explain the activities, we believed that this would require too many resources and would be overkill.

One form of media that we thought would be interesting to include in our lesson is AI. In our lesson, one of the learning activities has the student using ChatGPT as a sort of “teacher-on-demand”. ChatGPT is fantastic at generating material relating to low-level concepts, and so we believe it gives learners the perfect opportunity to test their understanding of our lesson by generating questions relating to Pythagoras’ theorem. Similarly, we also think it can help learners as it has the ability to show the students a step-by-step process for any particular question, and also explain (as in depth as necessary!) the reasoning for why a step occurs in any process.

Media From Other Sources

To help make our lesson more robust, we chose to add a section in our lesson that contained a few more outside resources on Pythagoras’ theorem. Mostly, these serve as additional resources for keen learners who wish to gain more knowledge about the theorem – namely in the form of proofs. Since we only introduce proof of Pythagoras’ theorem in the form of an infographic, we thought that it would be nice to include optional resources in the format of both text and video. For this purpose, we used resources from Brilliant.org and TED-Ed, both of which are extremely reputable learning resources. We thought that the TED-Ed video, in particular, would be great for those interested in history, as it goes over the many methods developed through history that prove the theorem (TED-Ed, 2017). Similarly, we added another short historical video from mathematicsonline that we thought was great as it goes over a brief history of the theorem (mathematicsonline, 2022).

Just for completeness, we thought that it would be beneficial to include a resource a bit more technical – the article from Brilliant. In particular, we thought that it would be a great alternative to those who prefer text over video, and for those who wanted to see equations for certain proofs (Brilliant, n.d.).

The Principles Involved in This Lesson

We made the conscious effort to include principles and lessons learned from every module that we’ve covered this semester. From the principles introduced in Module 1, to the multimedia shown in Module 5, we wanted to utilize what we have learned to it’s maximum potential.

In our lesson, we conscientiously incorporated Mayer’s Cognitive Theory of Multimedia Learning, which proposes that learners possess limited cognitive resources, emphasizing the need to minimize extraneous cognitive load. In order to create an efficient lesson plan, we want to be mindful of these principles. 

Most notably, in our instructional video, we refrain from using unnecessary text when narration is already present, recognizing that the combination of narration, graphics, and text can overwhelm learners with extraneous cognitive load – explained by the redundancy principle. To combat this, we stuck to a maximum of two of these components. 

Secondly, we want to maintain a focus on the Pythagorean Theorem in our lesson, excluding any excess information. This adheres to the coherence principle, making sure our videos are focused and concise. Keeping both the coherence principle and redundancy principle in mind will allow  us to minimize extraneous cognitive load.

Additionally, we consider the principle of modality when creating our screencast, recognizing that combining narration with a diagram is more effective than just labeling the diagram. To prevent information overload on the screen, we prioritize spoken explanations, ensuring a more efficient delivery of information. We also use a regular speaking voice, avoiding the use of a machine voice to consider the voice principle.

Keeping Mayer’s Cognitive Theory of Multimedia Learning in mind has been helpful in optimizing our lesson plan. While the principles listed are not exhaustive of all principles, they have been important to our lesson plan on the Pythagorean Theorem.

We wanted to keep our lesson accessible, aligning with what we have learned in Module 2. One of the main ways we did this was by hosting the video portion of our lesson on YouTube, which allows for automatically generated subtitles. Unfortunately, while using H5P to make our video interactive, it removed the option to use subtitles on the embedded video. As a work around, we provided a direct link to the video on YouTube for any learners who wanted to watch the video with subtitles enabled.

Additionally, we attempted to keep text in our lesson as “simple” as possible, and avoided any unnecessarily complicated language. We did this by making sure to speak in a conversational tone during the video portion of the lesson, and by writing the text portion of our lesson in a careful manner to make sure it was easy to understand.

From Module 3, we thought that because math can be a visual topic, especially when discussing geometry, we decided that including a video in our lesson would be best. Additionally, we realized that having a written or visual lesson that didn’t utilize some form of video could be unhelpful for learners. Video allows for instructors to go through example problems in a step-by-step process, and also allows for the instructor to demonstrate and explain why they are doing something during that step-by-step process. We believe that the instructional video that we included in our lesson accomplishes this task, and is well suited for helping learners understand the step-by-step process involved in the Pythagorean theorem.

From Modules 4 and 5, we decided that active learning is an extremely important part of a math lesson. We thought that including multiple activities for learners, ranging from interactive video through H5P, to in-person activities that can be conducted on your own, to using emerging technology (such as AI) to aid your learning, would be very important to cover in our lesson. So, we made a massive effort to include this, so that we could offer learners many avenues (in the form of different ways of active learning) so that they can practice the concepts taught in our lesson.

Concluding Thoughts

This project gave us a great outlet to apply all of the techniques, principles, and technology that we have learned and covered throughout this semester. We believe that the lesson that we have developed on the Pythagorean theorem is a fantastic reflection of what we have learned, and we hope that the efforts we made to utilize multimedia learning in an effective way are shown in our lesson.

References

Brilliant. (n.d.) Proofs of the pythagorean theorem. Brilliant Math & Science Wiki. https://brilliant.org/wiki/proofs-of-the-pythagorean-theorem/

mathematicsonline. (2022, Mar. 23). History of Math: Pythagorean Theorem [Video]. Youtube. https://www.youtube.com/watch?v=frQCjo3VjjI

TED-Ed. (2017, Sept. 11). How many ways are there to prove the Pythagorean theorem? – Betty Fei [Video]. Youtube. https://www.youtube.com/watch?v=YompsDlEdtc

Multimedia Lesson on Pythagorean Theorem (Assignment 3)

Lesson by Alys Grover, Charlie McCullough, Chris Ehmann, Ehtesham Ahmed, and Joel Vaz

Overview

The Pythagorean theorem is a useful mathematical relation named after the Greek philosopher Pythagoras. The relation states:

a2 + b2 = c2

Which is true for any triangle that contains a 90 degree angle. This theory is very useful in both mathematics and also real-world problems.

Read/Watch

For further information on Pythagoras’ theorem, consider these additional resources:

How many ways are there to prove the Pythagorean theorem – Betty Fei (5 minutes) – A TED-Ed educational video that goes through the many proofs (and the history of those proofs) of Pythagoras’ theorem

History of Math: Pythagorean Theorem (1.5 minutes) – Provides some history of the Pythagorean Theorem. Not necessary for understanding, but interesting for those wanting more information.

Proofs of the Pythagorean Theorem (6 minutes) – An article explaining a few different approaches to proving the Pythagorean Theorem, including proof by rearrangement, geometric proofs, and algebraic proofs.

Fundamentals of Pythagoras’ Theorem

The infographic below covers the fundamentals of Pythagoras’ theorem:

Infographic displaying the fundamentals of Pythagoras' Theorem

Using Pythagorean Theorem to Solve Problems

The Pythagorean theorem is very useful in solving certain problems. To understand how to use the relation, watch the video below. The video contains interactive tools that will allow you to try solving the problems shown on your own. Alternatively, the video can also be accessed by clicking here, which contains a version of the video that has subtitles.

Now that you have been shown how to solve problems using the theorem, consider trying these activities to strengthen your understanding of Pythagoras’ theorem.

Activity One: Hands-on Activity

For this activity, you will need chalk, a measuring tape or ruler, and access to some pavement outside. Once you’ve acquired these, draw a right triangle on the pavement, and measure two of the sides of the triangle (make sure to draw large enough triangles to measure!) Using what you have learned about the Pythagorean theorem, attempt to solve for the length of the side of the triangle that you haven’t measured. Once you’ve done so, measure the unknown side using your measuring tape (or ruler). Compare this to the number you got using Pythagoras’ theorem: are they the same?

Afterwards, draw some more triangles of various sizes, and try using Pythagoras’ theorem in different ways to strengthen your understanding of it!

Activity Two: Practicing With Artificial Intelligence

For this activity, you will need access to ChatGPT. Ask ChatGPT to generate some word problems that involve Pythagoras’ theorem! These problems will have real-world application, so it will make it easier to understand the value of knowing this theorem. Attempt to solve the problems given to you by ChatGPT! Once you have received an answer, ask ChatGPT to verify the answer for you. If you’re stuck on a particular question, ask the AI to help you out. Be careful, as ChatGPT may give you the wrong answer- always verify what it tells you.

Screenshot demonstrating how you might use ChatGPT to help you learn Pythagoras’ theorem (OpenAI, 2023)

References

Brilliant. (n.d.) Proofs of the pythagorean theorem. Brilliant Math & Science Wiki. https://brilliant.org/wiki/proofs-of-the-pythagorean-theorem/

mathematicsonline. (2022, Mar. 23). History of Math: Pythagorean Theorem [Video]. Youtube. https://www.youtube.com/watch?v=frQCjo3VjjI

OpenAI. (2023, Dec. 1). [ChatGPT response to a prompt about creating word problems using Pythagorean Theorem]. https://chat.openai.com/

TED-Ed. (2017, Sept. 11). How many ways are there to prove the Pythagorean theorem? – Betty Fei [Video]. Youtube. https://www.youtube.com/watch?v=YompsDlEdtc

Module Five: Advanced Multimedia Tools

Hey everyone,

This week’s module focuses on “Generative AI” and “Data Visualization”.

Generative AI, of course, is the hot topic of the year, and something I’m pretty familiar with at this point. Earlier this year when everyone was talking about “AI art”, I was there with them – trying out all of the new tools such as Midjourney, Stable Diffusion, and DALLE mini (if I remember correctly, DALLE-2 was invite-only around this time.) ChatGPT, at least the earlier models was also something I experimented with but didn’t use all too frequently. However, that’s where I stopped – I haven’t used any of these tools for at least half a year now, so having an opportunity to explore what has changed, and what has emerged on to the scene, was rather exciting.

Data visualization is also something I’m familiar with, but it was still extremely interesting to go over the various ways to represent data. The accessibility part of data was the most interesting for me. I’m slightly colourblind myself, so it was great to see an example listed showing how to use proper colour palettes to accommodate for colourblindness.

Generating music through AI

Generating text and images has already been explored extensively by millions (including myself), so I thought it would be better to start with something I wasn’t really aware of: using AI to generate music. I was unfamiliar with both of the tools listed, so I just chose whichever appeared to be easier to use, which was SOUNDRAW. Initially, I was amazed at the vast array of genres that they had!

Screenshot of SOUNDRAW’s library of genres

“Tokyo night pop” sounded pretty interesting, so I decided to start with that. They had multiple different themes and moods to choose from, you could alter the length of the song, and even choose which instruments you wanted present in your song. After clicking around, selecting what I liked, it then generated 15 different songs to listen to! Pretty cool. Unfortunately, it suffers from the same issue as AI generated imagery: it’s completely soulless. The “music” it gives you is so bland, so uninspired, and it all sounds the exact same. It really drives home how important the “human touch” factor is in any form of art, especially music. Nevertheless, I generated a link to one of the songs I created so that you can listen to it (SOUNDRAW, 2023).

Creating slideshows with AI

Next, it was onto another tool: Tome. With Tome, you can generate slideshows using prompts, which on the surface sounds like a fantastic idea! Presentations can feel extremely draining to create, so being able to use AI to generate them for you is a pretty neat use case. To test this, I went with an extremely simple prompt: “cats”. It generated a history of cats, different breeds, famous cats, and so on, and turned this all into a slideshow. It also allowed me to choose the individual layouts for each slide, which was nice. Unfortunately, the layouts are all pretty much the same, and falls into the same general issue of AI generating pretty bland things. Also, it’s not really a good slide show – it generates way too much text. It does give you options to edit what it has generated, which is nice pretty nice but if I’m generating a slideshow using AI, I presumably wouldn’t be that interested in doing large amounts of editing to fix the layout issues. Anyways, the slideshow can be found here (Tome, 2023).

Text to video with the power of AI

Finally, we’re exploring Runway.ml. This tool has an expansive suite of features, such as generating videos, editing videos, turning images into video, all powered with AI. As with most tools here, they offer a gallery of examples upon first opening the app:

Screenshot of Runway’s gallery of example videos.

Intrigued by the tool that allows you to turn images into video, I tested it out. For this, I generated an image using Stable Diffusion:

“Art of a waterfall in the middle of a forest in the style of Studio Ghibli,” (Stable Diffusion, 2023).

Then, I tossed this image into Runway’s video generator, and ran it a couple times. Here’s the result (Runway, 2023). Obviously, this isn’t the only usage of Runway – there’s much more to it, including some very neat features available to edit video and audio (such as blurring faces, automatically adding subtitles, cleaning up audio by removing background noise). I think out of the tools explored today, this is probably the most useful, just for the video editing suite alone.

The evolution of AI tools

I think for the most part, I was pretty disappointed at the abilities of the tools I explored. However, that will not always be the case. I believe that with the correct resources and the high levels of attention that AI is receiving right now, this technology will grow exponentially. In 2-3 years, the music generated might not be soulless and bland! The images generated will be even higher quality, and ChatGPT (if it still exists at that point, it seems like the company is going through a bit of a rough spot…) will be even more powerful than it is now.

Using AI to create an inclusive learning experience

For most of the tools explored, they have practically no use in creating an inclusive learning experience. However, there is one tool that I think is amazing for this purpose: ChatGPT. At least for introductory courses, ChatGPT can act as a “professor on demand”, and answer any questions you might have about (simple) topics. It could also generate exercises for a topic depending on the learners level of understanding (e.g., if the learner isn’t that experienced with a topic, it’ll give easier exercises, and could also explain to the learner step by step how to go through certain exercises).

I personally believe the “Medieval Plague Simulation” is also a good way to create an inclusive learning environment. For some learners, they may not understand scenarios super well, so having an ability to “go back in time” and do a simulation like that would help a whole new group of learners.

Of course, there are some groups who can be excluded by the usage of AI. I believe that would be mainly people who do not have an easy way to access this technology.

Final thoughts

I think it was very interesting to view the current state of AI. Unfortunately, most generative AI (outside of text) tends to be very bland and uninspired. I do think this is part of the growing pains of AI, as we are experiencing a relatively new era with this technology. As these models are trained and improved upon, they’ll be much more interesting and useful in the types of content that they generate.

References

Runway. (2023, November 22). [Runway’s generated video in response to an image prompt]. https://runwayml.com/

SOUNDRAW. (2023, November 22). [Generated audio produced by SOUNDRAW in response to the prompt, “Tokyo City Pop”]. https://soundraw.io/

Stable Diffusion. (2023, November 22). [Generated image in response to a prompt asking to create artwork of a forest waterfall in the style of Studio Ghibli]. https://stablediffusionweb.com/

Tome. (2023, November 22). [Generated slideshow in response to a prompt asking to create a presentation about cats]. https://tome.app/

Module Four: Learning Principles

Hey everyone,

For this module, we went through some of the principles commonly found in instructional design. We also analyzed the benefits of active learning, and employed some of our newly learned principles to create both an H5P learning object, as well as a mock lesson plan.

H5P Interactive Learning Activities

As with most tools I’ve encountered this term, I’ve never used H5P before. I found it to be a really well-made tool, and it was really easy and intuitive to create learning content with it. For my interactive learning object, I decided to make flashcards on something that I’m actually learning myself – Japanese. I’ve always heard that flashcards in particular are great for learning new languages, and after using H5P to create some, I can definitely see the value of this type of active learning.

Aside from flashcards, I think the other types of activities that I would use most in a “learning Japanese” context would be the “Dialog Cards”, “Fill in the Blanks”, and the “Guess the Answer”. Dialog cards, like flash cards, would also be a good way to memorize certain words and phrase. I would use fill the in blanks to learn grammar. “Guess the Answer” could be really interesting to use for learning Japanese, as it could be a good way of getting learners to actually write/type Japanese. I would use it by showing the user an image, and then have them write the correct translation of that image either in kana or kanji.

Creating a Lesson Plan

I wrote my lesson plan around introductory programming. I thought it would be good to focus on one topic in programming in particular (so that learners would not be overwhelmed), and so I chose to write my lesson plan on variables.

Overview

The topic for this week is variables. Variables are an extremely fundamental concept in programming; every solution you will ever implement while programming will involve variables in some way.

Lesson Objectives

By the end of this lesson, learners can be expected to know what a variable is, the various data types of variables, and how to use variables to solve trivial programming problems.

Read/Watch

Coding Basics – VariablesAn introductory video that explains what variables are

Computer Programming – VariablesA tutorial showing how to write variables in various languages

Content

In the “content” portion of this lesson, learners will be introduced to variables, why variables are used in programming, data types (e.g., integers, characters, floats) that are necessary for declaring variables, and they will be introduced to various short programming examples that use variables in some form.

Application

In the “application” portion of this lesson, learners will be expected to write a short program that uses variables in some form. Some options will be given to the student (although, if the student desires, they can implement their own unique exercises):

  • Create a temperature conversion program
  • Create a program that takes two integers, and does basic arithmetic operations on them (e.g., multiplies them together, adds them together)
  • Leap year calculator

Reflection

For the “reflection” portion of this lesson, learners will be expected to write a short discussion post that reflects on their experiences using variables. Some topics they will answer are:

  • What benefits are there to using variables? Do you think there are any drawbacks?
  • Did you find anything difficult about writing a program using variables? If so, what difficulties did you encounter?

To Do

  • Watch the video entitled, “Coding Basics – Variables”
  • Read the tutorial labelled, “Computer Programming – Variables”
  • Write a short program that utilizes variables
  • Write a discussion post that reflects on your knowledge of variables

References

Transcode. (2020, August 19). Coding Basics: Variables | Programming for Beginners | [Video]. YouTube. https://www.youtube.com/watch?v=ghCbURMWBD8

Tutorials Point. (n.d.). Computer Programming – Variables. https://www.tutorialspoint.com/computer_programming/computer_programming_variables.htm

Video for a Learning Purpose

For this week’s assignment, I thought it would be best to focus on a very simple topic when creating my video. This way, I could really focus on making a great learning experience without having to delve into an overly complex topic. So, I decided to make a video on brewing a cup of tea – probably one of the most mundane, easiest tasks to do. But, I asked myself, “What if someone had absolutely no idea how to brew a cup of tea?”, and I thought that was a pretty interesting topic, so I decided to make a video on it. I started with a simple storyboard, as shown below.

Image showing the first three storyboard components
Image showing the second three storyboard components
Image showing the final storyboard component

My storyboard breaks down brewing a cup of tea into a step-by-step process. I tried to make sure that absolutely everything was explained. Sometimes when I watch videos on how to do something, they’ll skip over key steps in the process, and it’ll leave me confused. I think creating a storyboard helped me avoid this, as it required me to plan out every single step in the tea-making process.

The script is as follows:

Shot One: Today, I will show you how to brew a cup of tea.

Shot Two: First, we will want to boil some water. I will do this using an electric kettle, as shown. If you don’t have an electric kettle, you could boil water on the stove, or even microwave the water until it boils.

Shot Three: While we wait for the water to boil, lets grab a cup to put our tea in.

Shot Four: Now let’s grab our favourite type of tea. I’ll be using Earl Grey, which is a black tea. For black tea, you want your water to reach a boil. For other types of tea, you’ll want to read the brewing instructions on the box to know the perfect water temperature.

Shot Five: Once our water boils, we’ll want to pour it into our cup, and let it steep for about 3-5 minutes, depending on how strong you like your tea.

Shot Six: Afterwards, you can discard the tea bag, and if you desire, mix in any “extras”, such as milk, cream, sugar, or whatever you desire. Or, if you’re like me, you can simply enjoy your tea as is.

Shot Seven: And that is how to brew a cup of tea. Thanks for watching.

Once I finished my storyboard, I shot the required video using my phone, and then edited it and recorded voiceover using Premiere Rush. Premiere Rush is basically just the lightweight version of Premiere Pro, and thus is perfectly suitable for simple editing. The finished video can be viewed below, or viewed through this link: https://www.youtube.com/watch?v=sv9NgHc7gdk

Reflection Questions

What is the learning purpose of your video?

The purpose of this video was to teach viewers how to make a cup of tea. I thought it would be best to experiment with this type of teaching by using a simple subject, and “learning how to make a cup of tea” was one of topics that I thought would be simple to record and write a script for, but also offer good insight into the process of making a learning video.

Which of the principles that we have covered did you incorporate, and why?

In general, I wanted to follow most (if not all) of the principles discussed in Mayer’s Principles of Multimedia Learning. The redundancy and coherence principles are two that I wanted to follow closely. For a task as simple as making tea, it would be extraordinarily unnecessary to have text on screen explaining what I’m doing, or to have off-topic discussions that don’t relate to the task at hand. For example, when I discussed boiling water, I mentioned the various ways of how one could boil water to make tea, be it by kettle, by stovetop, or (if you’re feeling a bit wild) by microwave. If I were to suddenly go into a rant on “what is the best kettle on the market?” or “which is the fastest method for boiling water?”, it would’ve detracted massively from the learning experience of a viewer. That isn’t information needed for a simple tutorial on making tea. Thus, the coherence principle is something I really wanted to stick to.

I also wanted to maintain social cue principles such as the personalization principle. In general, I always think keeping a conversational, friendly tone is better when making a video, whether or not it’s for a learning purpose. As such, I wrote a script for my video, but I made sure to ad-lib certain lines if they felt clunky/non-conversational, just to make it more personable.

What was challenging about capturing your own video?

Surprisingly, recording voice-over was a task that I found to be really difficult. Because I shot my video and recorded my script separately, sometimes I found that my script would be longer than the actual length of video that I shot for a certain scene. Also, it’s surprisingly hard to read from a script. Even when I had the words right in front of me, sometimes I would stutter, or mumble my words, or I would think to myself mid-sentence, “Wow, the script for this scene doesn’t sound good.” and then I would improvise on the spot to make whatever I’m saying sound better (but I would generally end up jumbling my words instead.)

What did you find easiest?

Recording video was what I found to be easiest. Since the task of “making a cup of tea” is relatively simple, I wasn’t really required to do anything during scenes. The only time I had to “be in scene” (I’m being pretty liberal with that phrase) was when I had to pour water from the kettle into the cup. Other than that, most of the video was essentially just static shots of the various items needed to make tea.

How would you approach capturing video differently next time?

What I would probably do is actually have myself in frame during the video, and rather than do voice-over, I would offer live commentary. I would also make a better attempt at recording “higher quality video” (e.g., make sure it’s framed properly, recorded in a higher quality format, ensure that lighting is better)

Module Three: Storytelling

Hey everyone,

In this module, we went through the various elements necessary in storytelling, and experimented with using video for a learning purpose.

Branched Stories

One of the tools we explored in this unit is Twine. Twine allows users to tell branching stories, and it is a very neat tool that I’ve never heard of before. Branching stories is something I’ve always found pretty interesting. One of my favourite games, The Stanley Parable, is heavily themed around choice, and as such extensively features branched storytelling.

To test this tool out, I created a simple story about someone waking up and heading to their job. An overview of my story can be seen below.

As shown in the screenshot, I had a lot of branches present in my story. I thought it was really interesting how easy it was to accomplish this in Twine, and it was really fun to experiment with.

The story I created is, for lack of better words, kind of boring. With that being said, I still think this was a great introduction into Twine, and I’m glad I had a chance to learn this tool.

Storytelling Techniques

Out of the storytellers in the TED talks presented to us, I thought Richard Turere was one of the most compelling. I’ve always felt immersion to be a critical aspect in story telling, and it really does separate a decent story from a great one.

Zak Ibrahim also felt very compelling to me. Similar to Richard Turere’s, I thought he did a great job in immersing the listener, and was very descriptive with his scenes. Additionally, his usage of suspense during storytelling was a fantastic element to include, especially in a topic as heavy as what he covered.

Links to Blog Comments

Module Five: https://alysgrover337.opened.ca/2023/11/21/module-5-advanced-multimedia-tools/#comments

Module Four: https://charlieswordpressblog.opened.ca/2023/11/11/module-4-principles-of-learning-design-and-active-learning/#comments

Module Three: https://alysgrover337.opened.ca/2023/10/25/module-three-story-telling-and-creating-video/#comments

Module Two: https://charlieswordpressblog.opened.ca/2023/10/08/module-2-design-principles-for-effective-and-accessible-multimedia/

Module One: https://charlieswordpressblog.opened.ca/2023/09/24/module-1/

Module Two: Design Principles

Hey everyone,

This week, we explored WAVE accessibility reports and creating effective infographics.

Accessibility in Web Content

I’m pretty familiar with accessibility-checker tools. Google has a neat tool called “Lighthouse” in their dev console, and it completes a similar function to WAVE.

Screenshot of Lighthouse report in Google’s developer console

With this being said, I’ve never used WAVE before, so I was interested in checking out what it had to say. First thing I noticed was how many contrast errors present. This is a pretty common design issue on the web where grey text is often used in search bars (and other areas), and I guess it was pretty expected for me. I didn’t think, however, that the blue links would also constitute a “contrast error”. That was pretty new to me.

Screenshot of WAVE report for my Module One blog post

The biggest surprise to me was how the embedded YouTube video was declared an “issue”. After looking into why, it was because WAVE tells you to check if the embedded video has synchronized captioning available. I always like to listen with captions on, so it was pretty cool to see this as an alert.

Creating a Canva Infographic

This was my first time ever using Canva, and also my first time creating an infographic! The accessible, easy to use templates were really nice. When creating my infographic, I wanted to focus on two principles: practical value, and well structured. By focusing on a very simple but important topic and keeping the content “lean”, I felt like I was able to accomplish this. Contrast and white space were also things I had in mind while creating my infographic. Using a template made it much easier to achieve these goals, as I found they all had good pre-defined layouts, and modifying my content to match these layouts was pretty simple.

Infographic describing the three branches of US Government

I think there are a few things I could’ve done better (the title feels a bit large and takes up a lot of space), but other than that I think it looks pretty good.

Module One: Screencasting and the Theories of Multimedia Learning

Hey everyone,

For this module, I decided to create a video on Figma. For those unaware, Figma is a tool used to quickly mockup user interface prototypes, and is a very good tool for any person interested in web development. For the purposes of a simple educational video, I decided to create a tutorial on using Figma to develop a very basic wireframe.

To record this video, I used Open Broadcaster Software (OBS), an open-source recording software that easily allows users to record the contents of their screen.

Applying Cognitive Load Theory

Since Figma can be pretty complex when used to it’s fullest potential, I decided to focus only focus on a few key features present in Figma. This, in my opinion, helps to prevent any extraneous load from unnecessary details that will probably not be necessary for beginners to know. I also decided to not overwhelm learners with a lot of information in a very long video. To accomplish this, I only demonstrated a select few features present in Figma, and used them to create a very simple wireframe.

Principles of Multimedia Learning

I found the principles discussed in this module to be pretty intuitive; especially the personalization principle. Whenever I’ve attempted to teach someone how to accomplish a task in the past, I’ve always used a casual but polite tone to instruct them on what to do. I believe that it helps to create a welcoming environment to learn, and so despite not specifically knowing of the personalization principle, it was always something I inherently attempted to be mindful of. In recording this screencast, I attempted to apply the personalization principle. I tried to suggest that viewers would do certain actions, and avoided using a forceful tone.

Segmenting was another principle I had in mind when creating this screencast. This principle was a bit harder to realize in terms of the content being taught, but my main “idea” was to show the basic steps in creating a wireframe on Figma. I segmented loosely based on steps (creating the Figma design file, then creating shapes in Figma, and finally using these shapes to create basic wireframes). I think there’s ways I could have segmented my lesson better, but overall I’m pretty happy with how it turned out.

I’ve embedded a link to my video down below for anyone who wishes to watch.

-Chris

My Introduction

Hey everyone!

My name is Chris, and I am a fourth-year computer science student. Outside of the classroom, I enjoy cooking, gaming, watching television (I recently watched the new One Piece live action show, and it turned out to be pretty good!). I’m currently taking a pretty relaxed, asynchronous, completely online term, and this happens to be one of the courses I decided to take. The topic of education is something I’m completely unfamiliar with, so I’m excited to learn a bit about it through this course.

-Chris